Ottobre Hug T-shirt
I swear that the clocks all speed up at the end of the year!
Towards the end of the year there, I was feeling like my productive streak had worn off and that I hadn't accomplished a lot. The funny thing is that once I started listing it, I realised I have got quite a bit done after all. I think it's the still-very long "to-do" list affecting my perception. There's only one way of fixing that - I'm throwing away the list.... :)
One thing I could cross off the list was the Ottobre Hug Tees (01-2008-12) for my nieces, complete with matching leggings (04-2008-2). I was so glad that Meggie Lulu pointed out there was a tutorial on the Ottobre Yahoo group! With pictures!

I made these following the Ottobre tutorial, although at some point I'd like to try Mermaids method to have only the one layer in the front.

Fold the seam allowances on binding in and fold down over piece 1b (lower front) and topstitch close to edge.

Sew shoulder seams. This gives a back with two fronts attached. Starting at right edge of 1b, sew the neckline binding with the right-side of binding to wrong side of neck edge. Continue up, around back neckline and along piece 1. Fold binding to front, fold in seam allowances and topstitch. The end result is a shape like this - (oops, forgot to take a photo there)

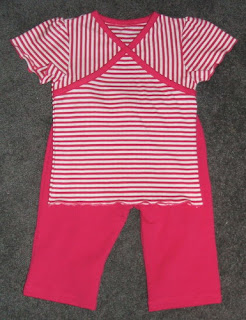
That's probably as clear as mud. :) All that's left after that is to match up side seams, attach sleeves etc. On DD's top I lettuce-edged the sleeve hems because she wanted "fluttery" sleeves. The finished result on DD -

The legging capris she is wearing are Ottobre 04-2008-18, made from a cotton/lycra from Spotlight. Because of fabric constraints I folded out 2.6cm from the bottom leg panel and a further 3 cm from the leg length. I think they've ended up a good length for a cool summer day and I plan on making more.
Tonight we lose the computer for a day or two - gulp! When it comes back, it'll be 'bionic-ed' up (better, stronger, faster.... lol) but how are we going to cope without the computer?!!
Towards the end of the year there, I was feeling like my productive streak had worn off and that I hadn't accomplished a lot. The funny thing is that once I started listing it, I realised I have got quite a bit done after all. I think it's the still-very long "to-do" list affecting my perception. There's only one way of fixing that - I'm throwing away the list.... :)
One thing I could cross off the list was the Ottobre Hug Tees (01-2008-12) for my nieces, complete with matching leggings (04-2008-2). I was so glad that Meggie Lulu pointed out there was a tutorial on the Ottobre Yahoo group! With pictures!


I made these following the Ottobre tutorial, although at some point I'd like to try Mermaids method to have only the one layer in the front.
Procrastination does have its advantages as it meant I didn't start DD's version until this year. It can therefore be entered in the Stash Contest on Patternreview. :)
As a memory jog to myself, and in case anyone else finds it remotely useful, I took a couple of pictures of the first binding piece.
For the yellow top I made for my niece, I put the binding on as directed (and as Mermaids shows in the above link). However, the cotton/lycra was thicker than a woven would be and therefore made some of the bound seams a bit bulky. So for the subsequent tees, I first of all trimmed 5mm from the trim-binding width, then sewed the binding and piece 1a (left upper front) right-sides together. Then I laid piece 1b (lower front) over, lining the cut edge up with the stitching, and then sewed within the seam allowance to hold it.

Fold the seam allowances on binding in and fold down over piece 1b (lower front) and topstitch close to edge.

Sew shoulder seams. This gives a back with two fronts attached. Starting at right edge of 1b, sew the neckline binding with the right-side of binding to wrong side of neck edge. Continue up, around back neckline and along piece 1. Fold binding to front, fold in seam allowances and topstitch. The end result is a shape like this - (oops, forgot to take a photo there)

That's probably as clear as mud. :) All that's left after that is to match up side seams, attach sleeves etc. On DD's top I lettuce-edged the sleeve hems because she wanted "fluttery" sleeves. The finished result on DD -

The legging capris she is wearing are Ottobre 04-2008-18, made from a cotton/lycra from Spotlight. Because of fabric constraints I folded out 2.6cm from the bottom leg panel and a further 3 cm from the leg length. I think they've ended up a good length for a cool summer day and I plan on making more.
Tonight we lose the computer for a day or two - gulp! When it comes back, it'll be 'bionic-ed' up (better, stronger, faster.... lol) but how are we going to cope without the computer?!!
Comments