Blogiversary, a cushion and Oven Mitts
Today's sewing was bought to you by the letter 'C' and the letter 'M'.
'C' is for
Just to maintain DD's giddy euphoria from her curtains, I also made her a cushion. It's pink with horses. Do you see a theme in her room? :)


I made a buttoned envelope-style cushion cover. Everything came from stash, including the buttons. That's another 0.5m for the Stash Contest. :)
..... and 'M' is for mitts. Oven Mitts to be precise.
The old ones were just shudderingly grungy, despite soakings in Napisan, so I felt no guilt in helping the tear get bigger so I could see what was inside. }:-) It turned out to be towelling.
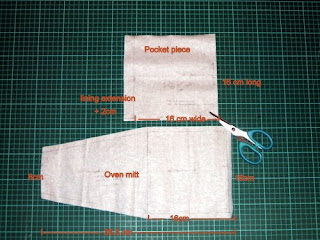
I started out by creating a pattern from the old, grungy mitts.
 NB: The measurements do not include seam allowance. I added a 1 cm seam allowance as you may be able to see in the photo.
Cut on the fold, 2 of the mitt pattern from the main fabric. Cut the desired padding, also on the fold.
Cut 2x full-sized pocket piece from the lining. Fold back the extra 2cm extension and cut 2x the pocket piece from the main fabric.
After a bit of testing involving a very hot tray, towelling and the remnants of cotton batting and the piece of thermal batting I had in the stash, I came up with a layer of the thermal batting (note: this is the thermal batting for making cooling lunchboxes etc) sandwiched between layers of cotton batting.

I lined the hand pocket with a checked cotton. I made the top layer of drill 1cm shorter so the lining would show as a band.
I sewed the top edge of lining and pocket, right sides together.Then I flipped the pieces right side out and lined the bottom edges up.

Topstitch the edge of the pocket piece. Place the bottom layer of mitt right-side up. Then the pocket, right-side down.

Continue adding the top of mitt (right-side down), then add the padding layer.

Pin together and sew around edges, leaving a portion along the side unsewn so you can turn it through. Turn through and handsew opening closed.
 The final result.
Comments